Roles and policies
When the "User accounts" tab is selected, it is possible to reach the role management interface by following a link that is located below the left menu (the one which contains the tree). The link itself is contained in its own window titled "Access control". The following screenshot shows how this window looks like.

Access control window.
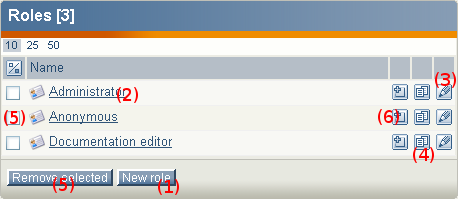
When the link is accessed, the system will display a window showing all the roles that have been defined. The following screenshot shows how this window looks like.

Roles window.
The "Roles" window allows you to do the following:
- Create a new role (1)
- View an existing role (2)
- Edit an existing role (3)
- Create a copy of an existing role (4)
- Remove an existing role (5)
- Assign an existing role to user accounts and/or user groups (6)
Viewing a role
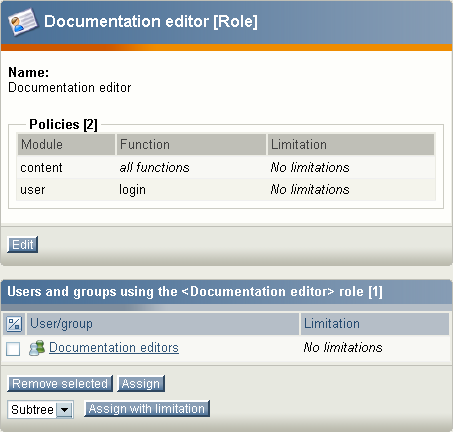
When clicking on the name of a role, the system will display two windows containing detailed information about the role that was accessed. The following screenshot shows how these windows look like.

Role view windows.
In the screenshot above a role named "Documentation editor" was clicked. The top window reveals the policies that make up the role. In this case, the role consists of two policies, one which grants full access to the "Content" module and one which gives access to the "login" function of the "User" module.
The second window shows an overview of user accounts and/or user groups that the role has been assigned to. The screenshot above indicates that the selected role ("Documentation editor") has been assigned to the "Documentation editors" user group without any limitations. The "Remove selected" button can be used to remove the assignments.
The "Assign" and "Assign with limitation" buttons make it possible to assign the role to other user accounts and/or user groups. The dropdown list can be used to choose the type of limitation that should be used. It is possible to limit an entire role to a subtree of nodes or to objects that belong to a specific section. When one of the assign buttons is used, the system will go into browse mode and allow the selection of user accounts and user groups that the role should be assigned to. Please note that the "Assign" button in this interface works in the same way as the "Assign" icon in the window which shows an overview of all roles.
Balazs Halasy (31/01/2006 11:49 am)
Balazs Halasy (01/02/2006 8:27 am)

Comments
There are no comments.