Image
Summary
Validates and stores a digital image.Properties
| Name | Internal name | Searchable | Information collector |
|---|---|---|---|
| Image | ezimage | No. | No. |
Description
This datatype allows the storage of digital images. It is capable of handling virtually any image type. The maximum allowed file size is determined by the "Max file size" class attribute edit parameter and the "upload_max_filesize" directive in the main PHP configuration file ("php.ini"). The following screenshot shows the class attribute edit interface for this datatype.
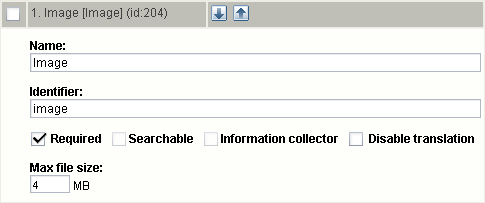
Class attribute edit interface for the "Image" datatype.
Max file size
The "Max file size" parameter makes it possible to set the highest size (in megabytes) that the system will allow. By default, this parameters is zero, which means that eZ Publish will not do any size checking when image files are uploaded. In the example above, the "Max file size" parameter is set to 16 MB, which means that the object edit interface will not allow the upload of images that are larger than 16 megabytes. However, if the value of the "upload_max_filesize" PHP setting is lower than 16 megabytes, the underlying system will cancel the upload.
Object attribute edit interface
The following screenshot shows the object attribute edit interface when an attribute using this datatype does not contain an image.
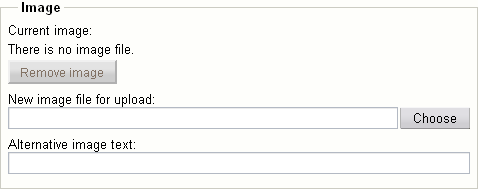
Object attribute edit interface for the "Image" datatype.
The following screenshot shows the object attribute edit interface when an attribute using this datatype contains an actual image. The interface reveals the image itself, the name of the file that was uploaded ("dj_cat.jpg"), the MIME type ("image/jpeg") and the size (29.02 kB).
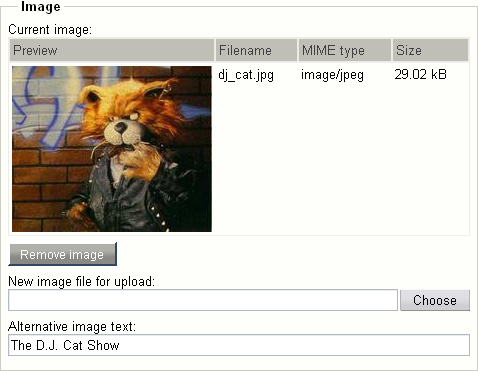
Object attribute edit interface for the "Image" datatype.
Storage
The uploaded images are stored on the filesystem. The main reason for this is because the filesystem is much faster than the database when it comes to the storage and retrieval of large data chunks. Having the images on the filesystem allows the webserver to serve them directly without the need of going through the database. In addition, this technique makes it easier to use external tools to manipulate the images and it dramatically decreases the size of the database.
All images uploaded through an attribute that makes use of the image datatype will be stored below "storage/images" within the directory specified by the "VarDir" directive in a configuration override for "site.ini". A directory structure is generated for each object that stores an image. The structure will be an exact copy of the actual node path (consisting of the object names) from the root to the main node that references the object which contains images. The following illustration shows the path to a directory on the filesystem in which the different images of an object are stored.

Example of image path on the filesystem.
In the example above, an image has been stored by an object called "My Something". The main node of this object is a child of a node called "Example". The var directory used by the siteaccess is "var/my_site". The images stored by the "My Something" object will be located in this directory. For each image, version and translation, a new directory will be created. The following illustration shows the naming convention of the directories under which the actual images are stored.
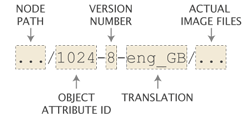
Example of an image subdirectory.
The example above shows a directory for an image that has been stored by the 1024th object attribute. The image belongs to the British translation for the eight version of the content object. The following illustration shows a complete directory structure with actual image files.
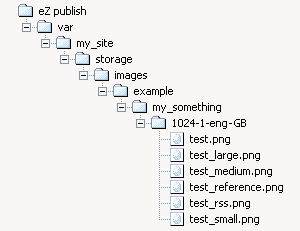
Complete directory structure with uploaded image and generated variations.
As the illustration indicates, the image stored by the 1024th attribute (that belongs to the "My Something" object) is represented by multiple files. The original image is "test.png", the rest of the images are the different image variations.
Image variations
With the help of an external application (ImageMagick) or the PHP image library (GD), eZ Publish is capable of generating different variations of an uploaded image. This feature is typically useful when there is a need to show the same image in different ways (for example different sizes). The image variations are controlled by different configuration directives in image.ini. The following table shows the default image variations.
| Variation | Width | Height |
|---|---|---|
| reference |
max 600 pixels |
max 600 pixels |
| small |
max 100 pixels |
max 100 pixels |
| medium |
max 200 pixels |
max 200 pixels |
| large |
max 300 pixels |
max 300 pixels |
| rss |
max 88 pixels |
max 31 pixels |
When an image variation is created (and the default settings are used), eZ Publish will generate a reference image using the file that was uploaded. The reference image is then used to generate the different image variations (small, medium, large and rss) on-demand using the constraints specified in the table above. The generated variations will be cached on the filesystem.
Depending on the image system used, eZ Publish is capable of generating image variations that consist of much more than just scaling. For example, it is possible to generate sharpened grayscale images for the thumbnails of a photo album. Please refer to the documentation of the image.ini configuration file for more information about the different possibilities.
Raw output
The ".content" of an ezcontentobjectattribute object using this datatype returns an ezimagealiashandler object.
Balazs Halasy (21/02/2005 2:39 pm)
Balazs Halasy (02/10/2007 7:21 pm)

Comments
Missing info about the original image
Friday 09 September 2005 9:36:13 am
Daniele P.
For example:
....data_map.image.content[original].full_path|ezroot
Rounded corners on images - HowTo
Wednesday 28 February 2007 11:32:41 pm
Paul Bolger
It is possible to overlay a mask (a second image with a transparent centre) in an overlaid div, but this solution has one big drawback: Internet Explorer has patchy support for the only image format which has full alpha support, png24. Which means you are stuck with using a gif, and with jagged edges.
A much better way is to get ImageMagick, one of the graphics processors included with EzPublish, to do the work. It is theoretically possible to get ImageMagick to measure the picture and draw the mask, but this is complicated (if anyone gets it to work please let us know). These discussions may be a good starting place if you feel like taking this to the next level:
http://www.imagemagick.org/Usage/thumbnails/#rounded_border
This section of the ImageMagick useage manual gives details on this, but there are hurdles which would need to be overcome, such as getting ImageMagick in EzPublish to read external vector files (.mvg)
and some more discussion here.
http://www.imagemagick.org/discourse-server/viewtopic.php?f=1&t=8401
For my particular use case we needed the resulting images to conform to an exact size, so rather than tackling the really hard stuff I elected to get ImageMagick to pull a png24 matt image from the design directory and overlay it on the source image. This is a simpler version of the technique described here:
http://www-128.ibm.com/developerw...y/l-graf2/?ca=dgr-lnxw15GraphicsLine
but as the final image size is pre-determined there is no need to add the corners individually.
The first thing you'll need to do is to establish whether the version of ImageMagick supports the -composite command. In the case of our host, Atvert Systems, we discovered that they were running the default version which shipped with the operating system - 6.0.7.1-16. (and this situation is quite likely for a professional hosting environment where system stability is more of a priority than having the latest versions of all components)
Luckily Karl, who runs Atvert, was very helpful in identifying the problem and he quickly upgraded ImageMagick to version 6.3.2.7-1, which supports the necessary commands.
The next step is to make a test graphic, you can skip this if you are feeling really sure of yourself but I'd recommend it - you'll probably save yourself a few headaches. Make a two layer Photoshop (but make sure you convert the background layer to an normal one in PS's case) or Gimp file, put the word 'front' on one layer and the work 'back' on another, both with transparent backgrounds. Export the two layers as png24s with transparency. Put the 'front' one in your siteaccess images folder - that will eventually be your matt.
You now need to find out the 'fully qualified path' to that folder. It won't be the ftp path. In our case in involved prepending /var/www/html/ to the address you see in an ftp client. It's probably best to contact your hosting provider on this, unless you feel like a lot of guessing.
Next, open image.ini.append.php. you can do this in either the siteaccess copy or the override copy. Just don't do it in both ! :)
The first thing to add is the filter definition, it goes in the [ImageMagick]
section:
[ImageMagick]
Filters[]=rounded=-compose dst-over -composite -gravity NorthWest /var/www/html/ ... more path goes here ... /design/news_site/images/picmask.png
This makes a filter called 'rounded', makes the destination go over the source, references the overlay to the top left corner and calls the matt image
The -gravity switch may not be necessary.
Next, make an alias for the image which will use the filter:
[AliasSettings]
AliasList[]=mypicturewitharoundedborder
Finally, add the filters to the alias;
[mypicturewitharoundedborder]
Filters[]=geometry/scalewidth=156 Filters[]=geometry/crop=156;90;0;0
Filters[]=rounded=
The first two filters resize the image to a width of 156px and then crop it to 156px by 90px. This means no matter what a user uploads they will get the same image size.
The final filter applies the mask.
Save and upload the ini file, go to your EzPublish content edit interface, choose an image (the 'back' one you made earlier) choose the mypicturewitharoundedborder alias from the dropdown and publish. When you are happy that it's working delete the 'front' image and replace it with one that does something useful!
Thanks to Bruce Morrison from DesignIT for his invaluable help in wrangling ImageMagick's sometimes slightly-less-than-intuitive command line syntax.