Custom install scripts
Packages that can be installed via the administration interface may include specific custom install and uninstall scripts. A custom script can be called at any stage during the package installation/uninstallation process. These scripts can be interactive and are capable of displaying extra wizard steps. Interactive scripts are based on a "wizard step" mechanism provided by the class "eZPackageInstallationHandler".
The following example demonstrates how to implement a custom install script for a package.
Example
Let's say that you need to add some additional post-install step(s) to a content object package called "Products" which is located under the "ez_systems" internal repository (in the "var/storage/packages/ez_systems/products" directory). To implement a post-install interactive script for this package, do the following:
- Create the following new sub-directories in the package directory:
- post-install
- post-install/templates
- Open the "package.xml" file located in the package directory and edit it. Find the list of items to install which is specified between the <install> and </install> XML tags and add the following item in the end of this list:
<item type="ezinstallscript"
      filename="myinstallscript"
      sub-directory="post-install" />
Create a file called "myinstallscript.xml" in the "post-install" directory (this file must contain a description of your install script) and add the following lines to it:
<?xml version="1.0" encoding="UTF-8"?>
<install-script filename="myinstallscript.php"
                classname="myInstallScript"
                description="This is my custom install step" />
This will tell the system that additional install step(s) is implemented in a PHP class called "myInstallScript" located in the "post-install/myinstallscript.php" file. The text description of the install script will be displayed in the beginning of the package installation process (as shown in the following screenshot).

Displaying a custom install script in the list of items during the package installation process
Create a file called "myownstep.tpl" in the "post-install/templates" directory (this file will contain a template for the additional install step implemented by your install script) and add the following lines to it:
<form method="post" action={'package/install'|ezurl}>

    {include uri="design:package/install/error.tpl"}
    {include uri="design:package/install_header.tpl"}

    <p>This is my custom step</p>

    <label>You may even click the checkbox if you want</label>

    <div class="block">
      <input class="button" type="checkbox" name="MyCheckBox" />
    </div>

    {include uri="design:package/navigator.tpl"}

</form>
The last step of the package installation will be displayed according to this template (look at the next screenshot).
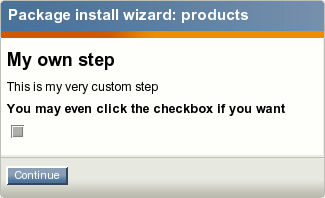
Displaying a custom wizard step during the package installation process
- Create a new file called "myinstallscript.php" in the "post-install" directory. This file must contain a PHP class called "myInstallScript" where all the steps are implemented (according to the description given in the "post-install/myinstallscript.xml" file). Add the following lines to the "myinstallscript.php" file:
<?php
class myInstallScript extends eZInstallScriptPackageInstaller
{
  function myInstallScript( &$package, $type, $installItem )
    {
        eZDebug::writeDebug( $installItem, "Hello from myInstallScript" );

        $steps = array();
        $steps[] = array(
          'id' => 'my_own_step',
          'name' => 'My own step',
          'methods' => array( 'initialize' => 'initializeMyOwnStep',
               'validate' => 'validateMyOwnStep',
               'commit' => 'commitMyOwnStep' ),
          'template' => 'myownstep.tpl' );
        $this->eZPackageInstallationHandler( $package,
                                             $type,
                                             $installItem,
                                             'My own custom step',
                                             $steps );
    }

  // Function that is called before the step is displayed.
  // You can use it to set variables for your template.

  function initializeMyOwnStep( &$package, &$http, $step, &$persistentData, &$tpl, &$module )
    {
        eZDebug::writeDebug( "Hello from initializeMyOwnStep()" );
        return true;
    }

  // This function is called after user has submitted the form.
  // If this function returns "false", the step will be
  // displayed again.

  function validateMyOwnStep( &$package, &$http, $currentStepID, &$stepMap, &$persistentData, &$errorList )
    {
        eZDebug::writeDebug( "Hello from validateMyOwnStep()" );
        return true;
    }

  // This function is called after the form is submitted
  // and validated.

  function commitMyOwnStep( &$package, &$http, $step, &$persistentData, &$tpl )
    {
        eZDebug::writeDebug( "Hello from commitMyOwnStep()" );
        return true;
    }
}
?>
Svitlana Shatokhina (14/09/2010 12:17 pm)
Geir Arne Waaler (28/09/2010 8:15 pm)
Comments
There are no comments.