Managing sections
The administration interface allows you to segment your content into into different parts. This can be done by making use of sections. A section is nothing more than an ID number. By assigning different sections to different nodes (pages), you can easily split your site into several parts. Please note that a node can only belong to one section. The idea behind this is that you can make parts of your site behave differently. For example, you can use sections to create a protected area on your site which can only be accessed by a group of users.
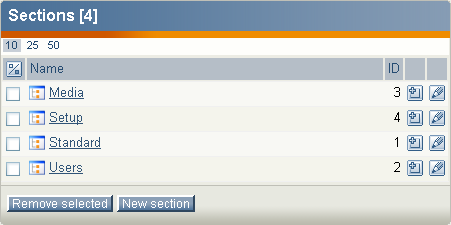
The sections can be administered using the section interface. This interface can be reached by clicking on the "Sections" link under the "Setup" tab. The following image shows how this interface looks like.

The "Section" interface.
The "New section" button will add a new section. You'll just have to fill in the name and click "OK". You can view more details about a section (along with the content, roles, etc. that belong to it) by clicking on a section's name. The edit icons on the right hand side allow you to rename the sections. The other icons (the ones with a small plus sign) make it possible to assign the sections to different parts of the node tree. If you click an assign icon, the system will bring up the browse interface and let you select a part of the site which should use that section.
Please note that when you assign a section to a node, all nodes below it will also be assigned to the same section. For example, if you create a new section called "Hot news" and assign it to a folder containing news articles, both the folder and the articles will belong to the "Hot news" section.
The "Remove selected" button allows you to remove the sections that are selected using the checkboxes. You should be very careful with this because removing a section might corrupt the system. Make sure that the section you're about to remove is not in use.
Creating a new section
- Bring up the section interface (click the "Setup" tab and then "Sections").
- Click the "New section" button.
- Type in a name for the section, for example "My section" and click the "OK" button.
Assigning a section to a node (or a collection of nodes)
- Bring up the section interface (click the "Setup" tab and then "Sections").
- Locate the section that you wish to assign and click on its corresponding assign icon. The system will display the browse interface.
- Select the nodes that you want to assign the section to and click "OK". The section will then be assigned to the selected nodes (and their children, if any).
Balazs Halasy (10/02/2006 11:52 am)
Balazs Halasy (28/02/2006 9:54 am)

Comments
Problems to access a created section
Tuesday 21 November 2006 7:44:35 pm
Eduardo Soluri
I followed many times your step-by-step and also copy the configuration of the Standard section, but neither seems to work.
I create a new section called Lastest News. After that, I assigned it to the folder News and assign also the Anonymous role to this section. I create a new override to Folder's Template filtering the last 3 news. Everything seems to be simliar to this manual, but when I try to access this area on my website, eZpublish shows me the Login Form. If I fill it (log in), the folder/content appears.
Can anyone help me please!!!
Thks in advance!
Re: Problems to access a created section
Tuesday 26 June 2007 8:59:53 am
Rahul Khanna
Re: Re: Problems to access a created section
Tuesday 26 June 2007 9:56:18 am
Svitlana Shatokhina