Hiding and revealing content
Once an object is published, it can not be unpublished because eZ Publish does not provide such a feature. Instead, the system provides a hiding mechanism which you can use to change the visibility of your nodes (pages). The hide feature makes it possible to prevent the system from displaying the contents of published objects on your site.
This feature is typically useful when you do not want visitors to see that you're working on something. You can simply hide a single node or a bunch of nodes. You'll still be able to access them in the administration interface, but they will not show up on your site. Please note that when you hide a node, the system will automatically hide the nodes that are below it. For example, if you hide a folder that contains a bunch of news articles, both the folder itself and the articles will be hidden.
Hiding nodes
The simplest way of hiding a node (or a subtree of nodes) is by clicking on its icon in the tree menu. You'll need to select the "Hide/Unhide" item from the "Advanced" submenu. The system will then change the visibility status of the target node. By default all nodes are visible. When you do this for the first time, the target node (and the nodes below it, if any) should become hidden.
Revealing nodes
A hidden node (or subtree of nodes) can be revealed using the same technique that was described under "Hiding nodes". You'll have to click on the icon of the node that you wish to reveal and select the "Hide/Unhide" item from the "Advanced" sub-menu. When this is done, the system will reveal the node (and its underlying nodes, if any).
Checking the visibility status of nodes
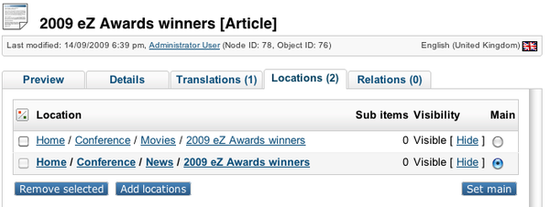
The visibility status of the nodes is indicated by their text-background in the tree menu. A visible node has white/transparent background. The names of hidden nodes have a gray background. To check the visibility of a node you can also hover your mouse over the node's name for example in the "Sub items" window. The tool-tip will reveal the node's visibility status. A third way is to enable the "Locations" window, which contains detailed information (including visibility status) about the locations of the node that is being viewed.
The following image shows what this window looks like.

Please note that the title of the preview window (showing the node that is currently being viewed) will indicate if the node is hidden or not.
Hiding before publishing
Sometimes you want to publish a node but you do not want it to be visible on the site when it is published. Maybe it contains unfinished work or maybe you do not want to publish it before a given date/time. You can simply change the visibility status in the edit interface while editing before clicking the "Send to publish" button.
First of all, you'll need to enable the "Locations" window. This can be done by clicking the "On" link for "Locations" in the "User preferences" settings in the collapsible right menu.

When done, the object edit interface will contain an additional window at the bottom. This window will allow you to control how and where the object that is being edited should be published. The following image shows what this window looks like.

You can use this window to control where the object should be published and how it should be published (sorting settings, visibility status and so on.).
Related children
One of the reasons for publishing a newly added object as hidden can be that you wish to add related content directly beneath the corresponding node in the content tree. This is not possible until the object is published for the first time. Once an object is published, a corresponding node (visible or hidden) will appear in the content node tree and thus you will be able to place content beneath it.
For example, you can publish an unfinished article as a hidden node, upload related images as children, re-edit the hidden article and reveal it when finished. In this case, you may wish to continue editing the object right after publishing it the first time (or continuously for that matter) - meaning that you want to get back to the object edit interface after clicking the "Send for publishing" button. This can be done by checking the "Back to edit" check-box located in the bottom of the object edit interface. Note that by default, the "Back to edit" check-box is not a part of the object edit interface. It can be added by clicking the "On" link for "Re-edit" in the "Edit mode settings" window in the "My account" tab.
Balazs Halasy (07/05/2010 9:03 am)
Geir Arne Waaler (07/09/2010 11:19 am)

Comments
There are no comments.