Adding content
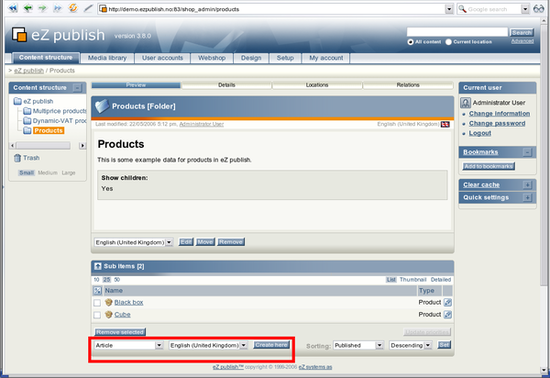
When you've found the location where you wish to add content (a new page by the way of a new node), you must use two dropdown menus and the "Create here" button - they are located in the lower left corner of the "Sub items" window. In the following screenshot a red frame is used to indicate the whereabouts of these items.
As the screenshot indicates, we have navigated into a folder called "Products". There are two dropdown lists at the bottom. The first one allows us to select the type of node (page) that should be created. Please note that the contents of this list depends on the available classes (the data structures that have been set up for the site) and the permissions of the user who is currently logged in. This dropdown typically allows you to create generic information pages, news articles, product pages, forums and so on. The second dropdown list allows us to select the language which should be used when creating an object (page). In the screenshot above "Article" is selected from the first dropdown list and "English (United Kingdom)" is selected from the second one. This means that when you click the "Create here" button, the system will go ahead and create an article in English inside the "Products" folder.
There are no limitations whatsoever when it comes to the different types of nodes. In other words, you can create any type of node under any other node as long as the class is configured as a container. When you click the "Create here" button, the system will display the object edit interface. The following list of steps sum up what you should do when you want to add/create new content:
- Make sure that you're logged into the administration interface.
- Use the first three tabs, the left menu and the "Sub items" window to find the location where you want to add new content.
- Use the dropdown boxes in the "Sub items" window to select the type of content you wish to add (article, information page, user, etc.) and the desired language for this content.
- Click the "Create here" button, the system will bring up the edit interface.
- Use the edit interface to add the content. Please refer to the editing content page for details.
- When done, click the "Send for publishing" button, the content will be published at the location that was chosen in step 2.
Balazs Halasy (06/02/2006 8:48 am)
Svitlana Shatokhina (12/07/2006 11:54 am)


Comments
There are no comments.