User registration
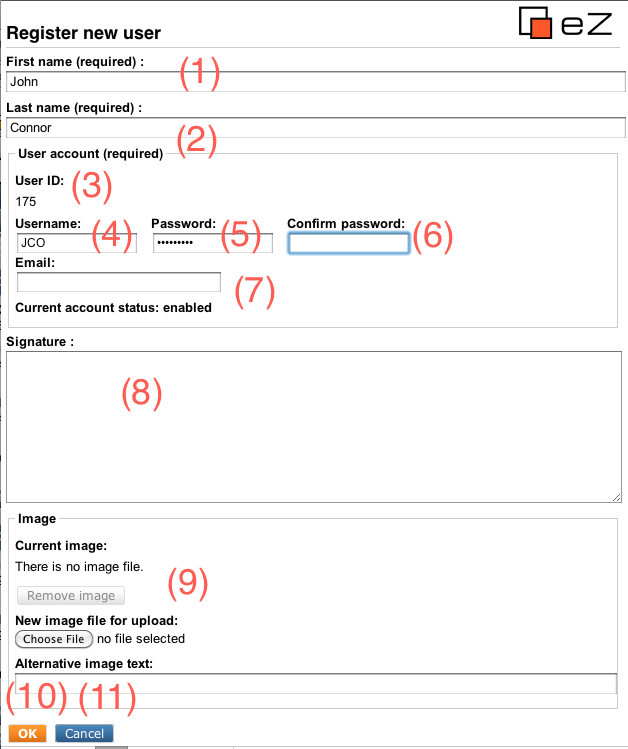
The user registration mechanism provides a form that allows new users to register themselves on the system. It can be reached by pressing the "Register" button on the login page. In order to register, the user must fill out the fields which are marked required and click the "OK" button. The following screenshot shows a filled out version of the registration form.

(1) - First name field
This is where the user must enter his/her first name (for example "John").
(2) - Last name field
This is where the user must enter his/her last name (for example "Connor").
(3) - User ID
This number reveals the identification number of the user account that will be created.
(4) - User name field
This is where the user must enter a desired user name (for example "jconnor"). The user name may consist of any character. This field is case insensitive, in other words "JConnor" will be the same as "jconnor".
(5) - Password field
This is where the user must enter a desired password (for example "T-1000"). The password must be at least three characters long. This field is case sensitive, in other words "t-1000" is not the same as "T-1000".
(6) - Confirm password field
This field must contain the exact same password that was typed into the password field. It allows the system to avoid scenarios where the user accidentally registers the account with a mistyped password.
(7) - E-mail field
This is where the user must enter his/her E-mail address. The entered address will be used whenever eZ Publish attempts to communicate with the user. For example, the system will send the registration confirmation mail to this address.
Please note that the default behavior/configuration of eZ Publish does not allow multiple users to be registered with the exact same E-mail address.
(8) - Signature field
This field is not required. It can for example be used to store additional information about the user.
(9) - Image cluster
This interface allows the user to upload an image of himself/herself. An image can be selected by clicking the "Choose" button. Once an image has been selected, the "New image file for upload" field will contain the location and the name of the selected image. This field can also be filled out manually instead of using the convenience that the "Choose" button provides. The "Alternative image text" field allows the user to specify a short text that will be used whenever the image is not accessible or when the registered information is viewed in an alternate way (for example text-only).
(10) - OK button
This button allows the user to submit the registration form. Once the button is clicked, the system will attempt to register the user.
(11) - Cancel button
This button can be used to cancel the user registration. When clicked, the system will get rid of the entered information and bring the user back to the login page.
Successful registration
If all fields have been filled out correctly, the "OK" button is clicked and the system is able to register the new user account, the following dialog will be displayed:

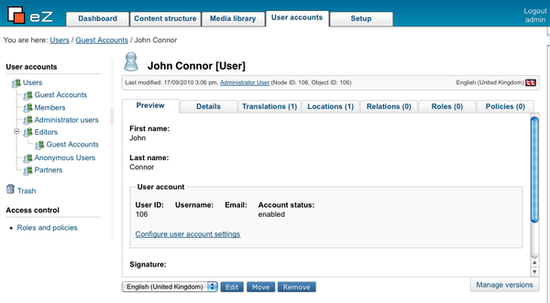
The newly generated user account will be disabled until the user checks his/her mail and clicks on the registration link. Once this link is accessed, the registered account will be activated. Newly registered accounts will be placed inside the "Guest accounts" user group which is located under the "Users" top level node:

If something goes wrong, the system will show an error message explaining what went wrong and what can be done in order to fix the problem.
Balazs Halasy (07/05/2010 8:53 am)
Geir Arne Waaler (26/10/2010 9:01 am)

Comments
activation email
Friday 07 May 2010 8:53:55 am
manuel gordoa